angular 项目,在实际使用开发时,难免会遇到需要使用多国语言的需求,也就是 angular 的国际化 i18n 的需求。
那么如何做到呢?
本文主要通过对一个常见的注册页面,实现多国语言版本的切换,来说明 angular i18n 的用法。代码已放到github。
创建一个 angular 项目,并编写英文版注册页面
1、创建项目
创建就是直接终端输入ng new angular-i18n-demo即可。
因为只是说明 i18n 的使用,不会过多复杂,不需要其他的模块例如 router、service 等。
目前前端开发,不使用一些样式(说白了就是 UI 组件)就很累,所以创建好 angular 项目之后,添加 angular material,使得注册页面稍微好看一点。
在 angular 项目根目录终端输入ng add @angular/material即可。
2、编写页面
不需要实现注册功能,构建一个注册页面就好了。因为已经使用了 angular material,就稍微用几个模块。
2.1、在 app.module.ts 引入 angular material 模块
在 app.module.ts 的@NgModule 装饰器下的 imports 属性中,添加以下内容:
BrowserAnimationsModule,
MatToolbarModule,
MatCardModule,
MatInputModule,
MatButtonModule,
MatIconModule
然后逐一导入,在顶部应该会有:
import { BrowserAnimationsModule } from '@angular/platform-browser/animations';
import {
   MatInputModule,
   MatCardModule,
   MatToolbarModule,
   MatButtonModule,
   MatIconModule
} from '@angular/material';
2.2 在 app 目录下,创建一个注册的组件
如下图:

我这个是直接使用指令ng g component register生成,angular-cli 工具的操作,它会直接把这个组件也添加到模块文件:
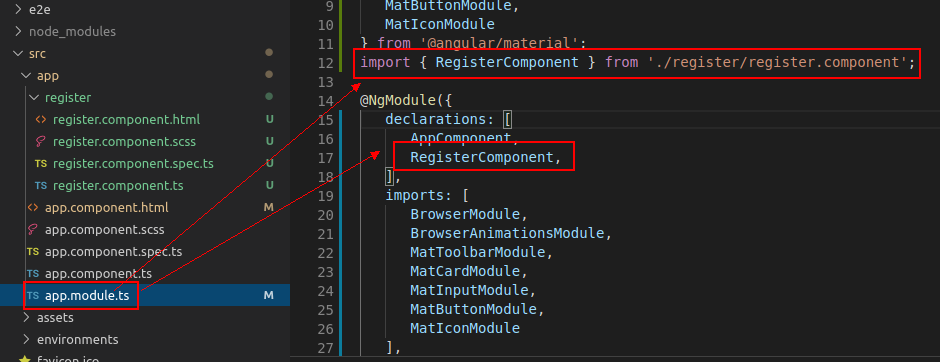
2.3 添加代码:
修改register.component.html代码如下:
<div class='my-div'>
<mat-toolbar>
<mat-icon>create</mat-icon> Registration
</mat-toolbar>
<mat-card>
<mat-card-content>
<form>
<div class="word-align">First Name</div>
<mat-form-field>
<input matInput placeholder="First name" name="fname" required>
</mat-form-field>
<br />
<div class="word-align">Last Name</div>
<mat-form-field>
<input matInput placeholder="Last Name" name="lname" required>
</mat-form-field>
<br />
<div class="word-align">Address</div>
<mat-form-field>
<input matInput placeholder="Address" name="address" required>
</mat-form-field>
<br />
<div class="word-align">Email</div>
<mat-form-field>
<input matInput placeholder="Email" name="email">
</mat-form-field>
<br />
<div class="word-align">Password</div>
<mat-form-field>
<input matInput placeholder="Password" name="password">
</mat-form-field>
<br />
<div class="word-align">Confirm Password</div>
<mat-form-field>
<input matInput placeholder="Confirm Password" name="confirmPassword">
</mat-form-field>
<br />
</form>
</mat-card-content>
<mat-card-actions>
<button mat-raised-button (click)="register()" color="primary">REGISTER</button>
</mat-card-actions>
</mat-card>修改register.component.scss代码如下:
// div居中
.my-div {
  width: 40%;
  margin-left: 30%;
}

// 设定form中label等宽
.word-align {
  display: inline-block;
  text-align: justify;
  text-justify: distribute-all-lines; /*ie6-8*/
  text-align-last: justify; /* ie9*/
  -moz-text-align-last: justify; /*ff*/
  -webkit-text-align-last: justify; /*chrome 20+*/
  width: 70px;
  margin-right: 0px;
}因为我们不会去实现注册功能,所以在register.component.ts中,只需要添加一个空白注册函数就好了:
import { Component, OnInit } from '@angular/core';

@Component({
  selector: 'app-register',
  templateUrl: './register.component.html',
  styleUrls: ['./register.component.scss']
})
export class RegisterComponent implements OnInit {

  constructor() { }

  ngOnInit() {
  }

  register() { } // 新建一个空白注册函数
}
2.4 将注册页面显示出来
现在运行这个 angular 项目,首页看到的还是默认的界面。
删除 app.component.html 原本的所有东西,添加一句各个注册组件的 selector:
<app-register></app-register>我用ng server -o --port 1234启动,在浏览器中应该看到如下画面:
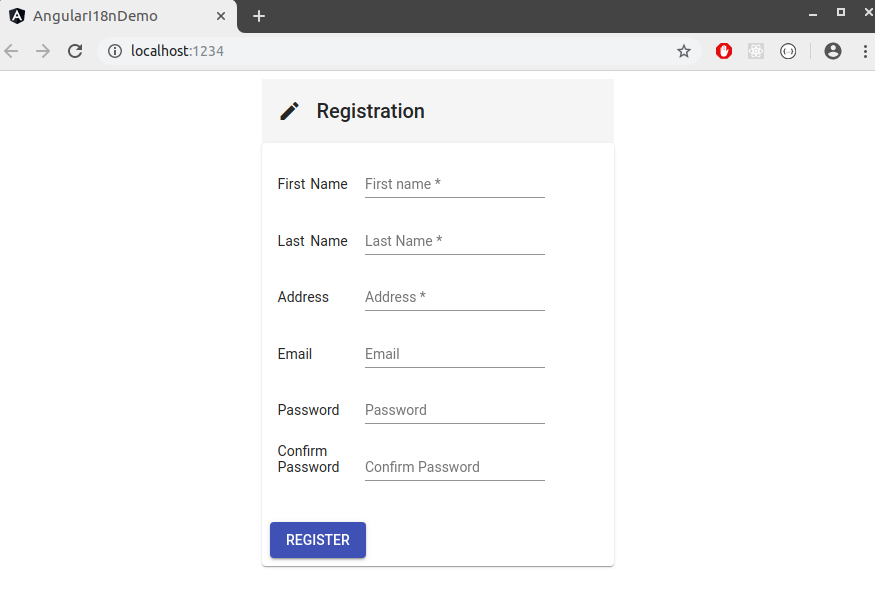
到这里,常规的注册页面就完成了,是个英文版本,i18n 准备工作就好了,下面开始实现变简体中文。
修改注册页面为简体中文版本
在 angular 官方文档中,我们可以看到i18n 模板翻译分为 4 个阶段,主要就是
- 在组件模板中标记需要翻译的静态文本信息。
- 创建翻译文件:使用 Angular CLI 的 xi18n 命令,把标记过的文本提取到一个符合行业标准的翻译源文件中。
- 编辑所生成的翻译文件:把提取出的文本翻译成目标语言。
- 把翻译完成的文件合并回应用
一步一步来。
1、组件模板中标记需要翻译的静态文本信息
常规的标签直接在标签中添加 i18n 关键字即可,如下图:

要翻译的内容的元素标签中其他内容时,可以使用 ng-container 将文本包裹起来,示例如下:

如果是要翻译某个标签的属性值,则需要添加 i18n-<属性名>标签,示例如下:
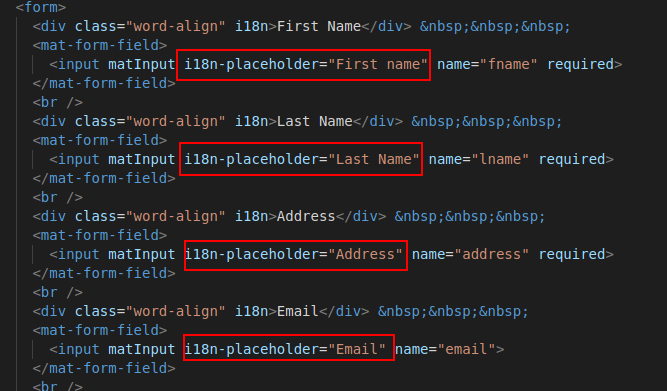
更多用法参看 angular 官网i18n 模板翻译
2、创建翻译源文件
将模板做好标记后,使用指令ng xi18n --output-path <path>,生成翻译源文件,<path>则是文件位置。
此外还有属性:
- –i18nFormat:明确指定想用的格式(默认 XLIFF 1.2)
- –out-file: 为提取工具生成的翻译源文件改名(默认为 messages )
- –i18n-locale:指定应用的基本地区(对 angular 没有,但可能对其他需求有用)
- 等等
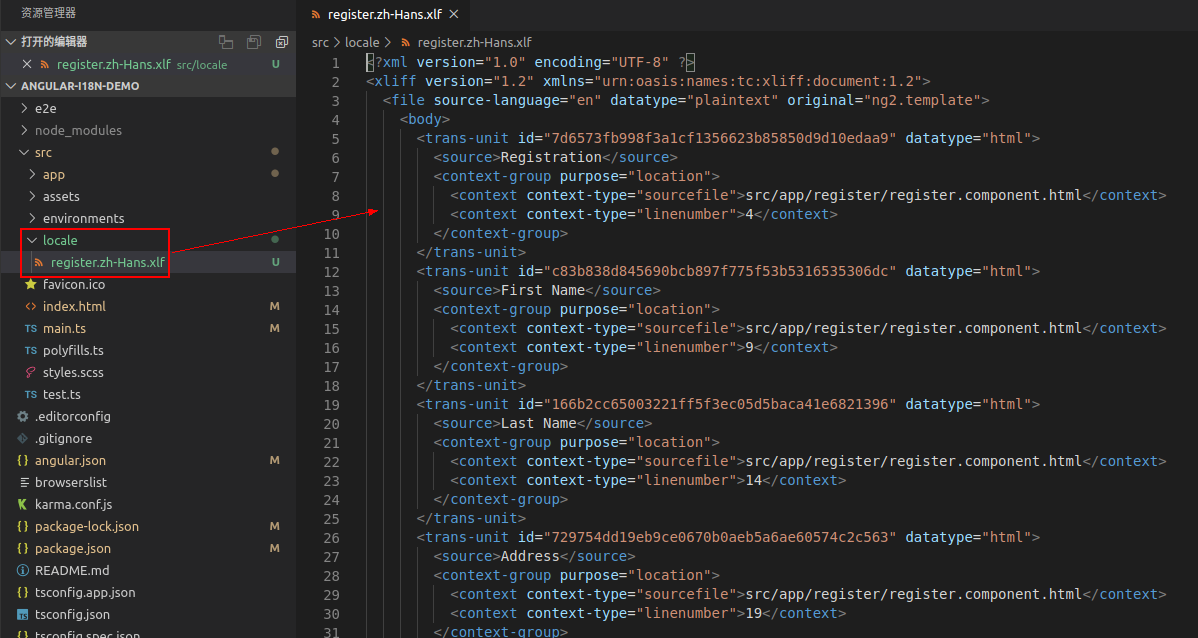
我的指令是ng xi18n --output-path src/locale --out-file register.zh-Hans.xlf,生成的翻译源文件如下图:
3、翻译文本节点
打开生成的翻译源文件,找到文中的
现在要做的就是,复制
例如,我现在要做的是把英文翻译成简体中文,那么修改示例如下:
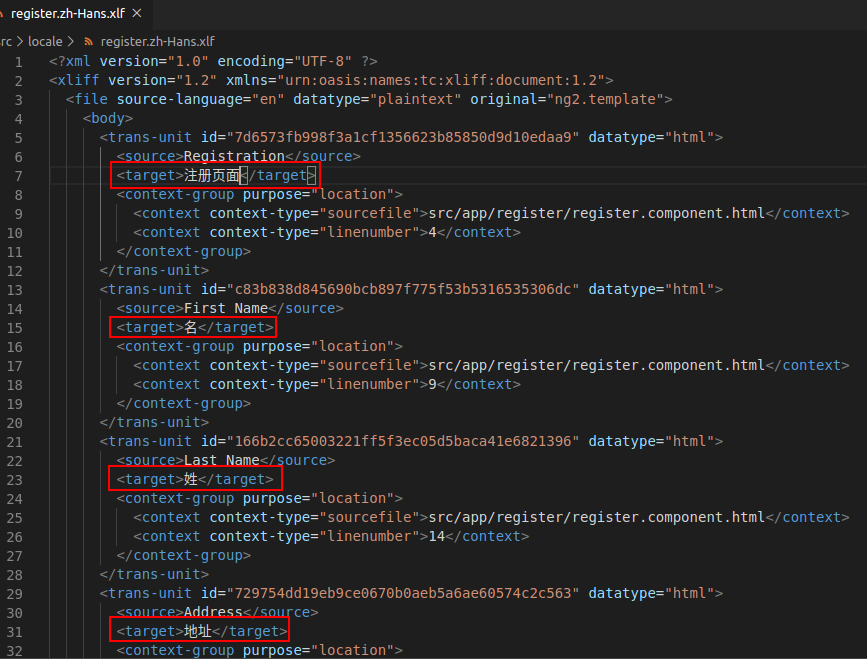
注意所有的
特别注意:
- 翻译源文件里面有很多的 id,而且还特别长.
- 这是因为在“1、组件模板中标记需要翻译的静态文本信息”时,没有给每一个标记 i18n 的地方添加 id,所以工具自动生成了随机 id。
- 这个 id 最好不要修改,一旦修改可能在文字替换时就对应不上。
- 如果模板文件有修改,则可能需要重新再生成一份翻译源文件,因为这些随机 id 可能已经变了。
当然,如果不嫌麻烦,可以给每个模板文件有标记 i18n 的地方,都给他添加 id,那么生成的翻译源文件的 id 就不会变。
模板中添加 id 使用示例:
<div class="word-align" i18n="@@firstName">First Name</div> (因为工具会生成随机 id,且如果需要翻译的文字太多,逐一设置 id 比较麻烦,所以我没有这样设 id)
4、修改 angular.json 配置文件
4.1、添加编译配置
打开 angular.json 文件,找到属性 projects–>{angular-i18n-demo(angular 项目名)}–>architect–>build–>configurations;在 production 同级属性,添加对不同语言的编译配置,如下图:
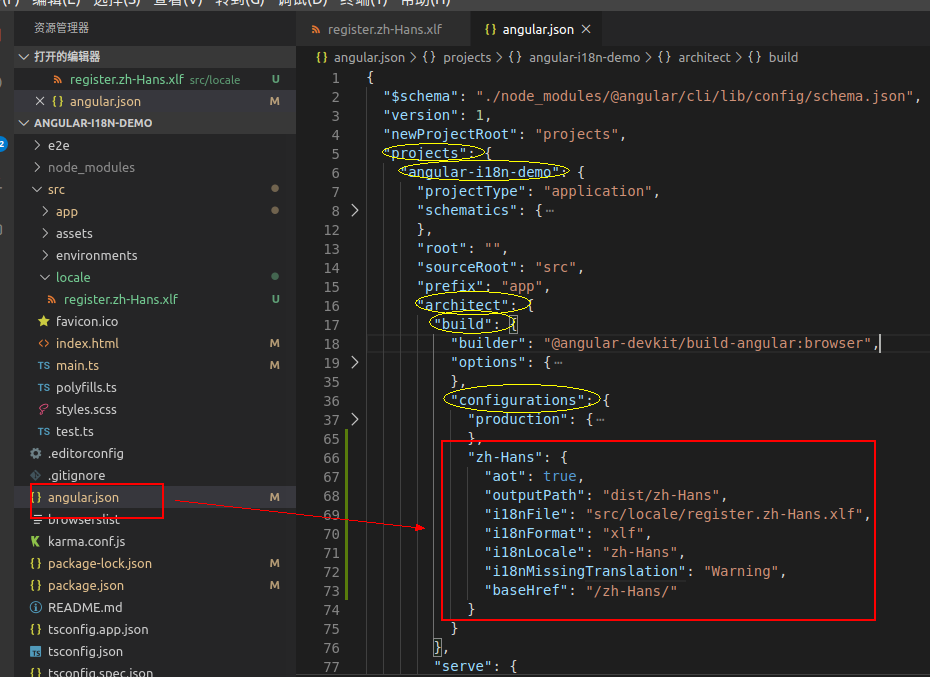
配置内容简单说明:
- 使用 AOT 方式编译
- 文件输出路径
- i18n 文件位置
- i18n 使用的格式
- i18n 的位置
- 如果翻译有缺失报警告
- 添加基本路径
最后一条需要多说一点,就是翻译后,例如英文版本编译后访问的地址是http://localhost:4200/register,如果要看到中文版,则需要访问http://localhost:4200/register/zh-Hans
4.2、添加测试运行配置
同样在 angular.json 文件,就在添加编译配置的父级 build 下一个属性 server,在 server–>configurations 属性,在 production 同级属性,添加以下内容:
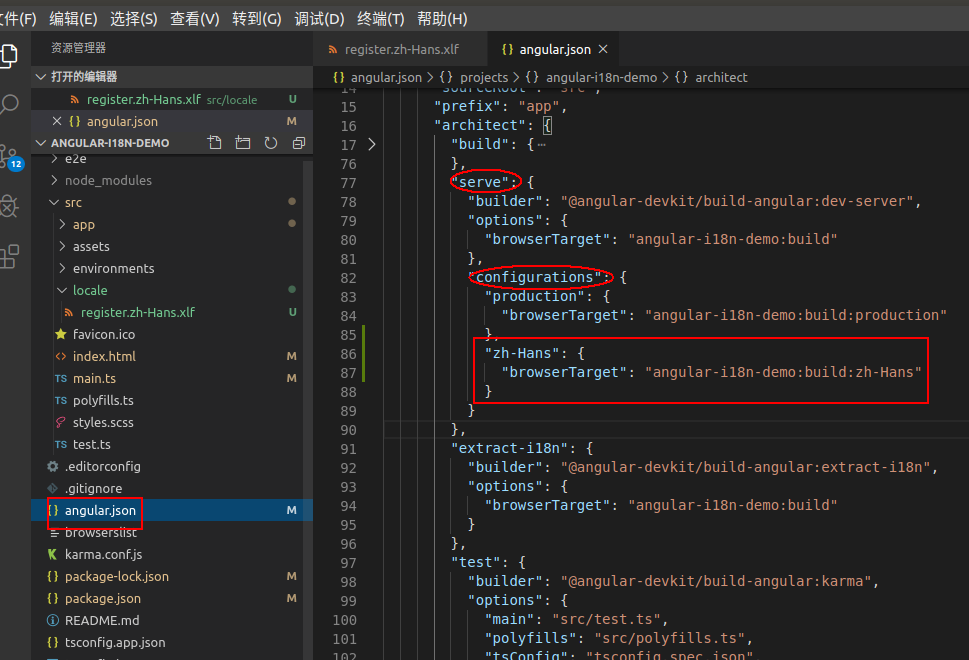
注意:ng serve 运行时只能一次运行一种语言的翻译,无法同时加载多种语言。
5、测试运行,查看效果
到这里,我们就有了一个简体中文版本的注册页面可以看了。
启动项目,在项目根目录启动终端输入
ng serve --configuration=zh-Hans -o --port 1234项目启动成功,则可以看到简体中文版注册页面了,如下图:
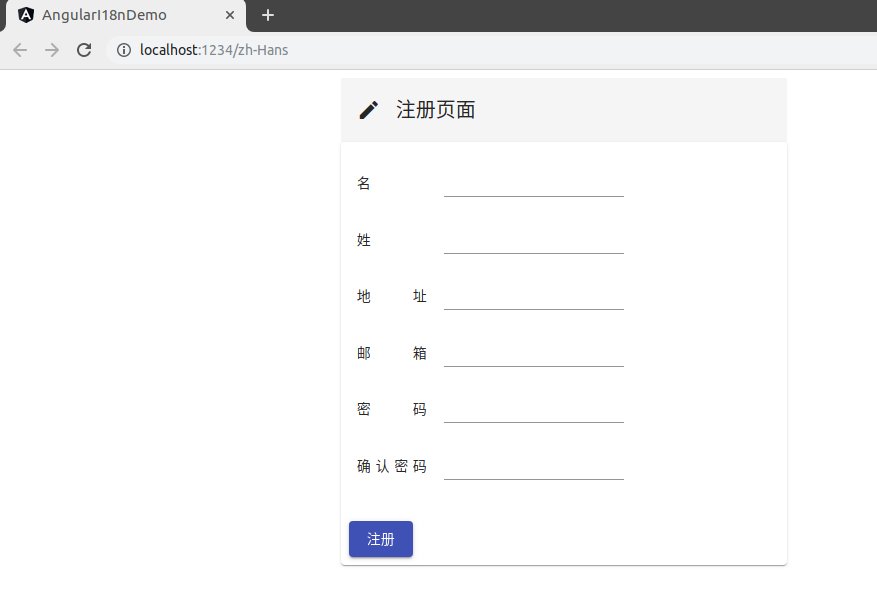
注意看 url,之前的英文版是直接的http://localhost:1234,现在简体中文版是http://localhost:1234/zh-Hans
如果觉得每次测试运行查看修改输入文字太长,可以修改 package.json 文件,在 script 属性下,新加一句
"zh-Hans": "ng serve --configuration=zh-Hans -o --port 1234"就可以使用npm run zh-Hans启动了。
后续将 angular 项目便已打包部署到服务器例如 nginx,则可以设计点击按钮切换 url,切换语言,
就和 MDN 一样效果。
例如https://developer.mozilla.org/en-US/docs/Glossary/JavaScript是英文,
直接修改 url 为https://developer.mozilla.org/zh-CN/docs/Glossary/JavaScript就变成简体了。
小结
到这里,angular i18n 多国语言使用说明就基本完了,更多的细节可以去 angular 官方国际化 i18n升华。
总结一下基本步骤:
- 准备好需要翻译的页面模板;
- 根据需要翻译的页面模板,创建对应的翻译源文件;
- 修改翻译源文件,添加
标签即内容; - 修改 angular 项目的配置;
- 运行查看结果。
源代码已放到github,已经整理添加了中文繁体、中文简体、英语、百度翻译版本日语,可参考配置 angular i18n 多国语言。

